
If you are a presenter, you probably know how important it’s to make your presentation attractive to keep the audience attentive until the end. The Microsoft PowerPoint program allows you to insert audio and videos into your presentations. In this article, I’m going to explain how to embed a video in PowerPoint and also how to embed a YouTube video in PowerPoint.
Embedding videos into PowerPoint presentations is a safe and easy way to improve their appearance, visibility, and also to keep the audience active and attentive. Videos help the presenter explain the information more, improve visuals, and engage audiences better.
In previous versions of PowerPoint, 2007 or earlier, it was quite difficult to add a video to a slide. You needed to put the video file to add in the same folder where the PowerPoint presentation is located, and then you have to “link” the video to an object or hyperlink inside a slide. So when you click on the link, PowerPoint immediately loads the video from the specified folder.
Fortunately, things have changed a lot in the newer versions of PowerPoint (2010 or newer) and other techniques and features are available to you. Now, you can easily embed a video in PowerPoint slides and presentations, so you don’t have to put the video in a specific folder location.
What video formats work in PowerPoint?
Supported video formats that can be easily integrated into PowerPoint of the Office 2010, 2013, 2016, 2019, and newer versions
– Windows video file (ASF, AVI)
– MP4 video file (MP4, M4V, MOV)
– Movie file (MPG, MPEG)
– Adobe Flash Media (SWF)
– Windows Media Video File (WMV)
We can embed a video in PowerPoint both from the Internet and directly from the computer’s hard drive. Embedding videos are useful, but the embedding automatically enlarges the presentation file.
In the latest versions of PowerPoint, it is best to use H.264 video (MPEG-4 AVC) and AAC audio encoded MP4 files.
How to embed a video in PowerPoint from PC
If you need to embed a video into your PowerPoint presentation, the process will vary slightly depending on the version of PowerPoint you are working with. The first way to embed a video in PowerPoint is to do it from a file on your computer. So you will need to download the video you want to embed and save it as a video file on your desktop or wherever you want.
Note:
This is very useful in case you are working on a Mac or just want to embed a video in PowerPoint that can be played without an internet connection.
Then follow the steps below to embed a video in PowerPoint.
Step 1: Select the slide to embed a video in PowerPoint
To begin the process of embedding videos into PowerPoint. First, open your presentation and go to the slide where you want to embed the video. You always have the option of rearranging your slides later if you change your mind.
Step 2: Select the video to insert into your slide
After selecting the slide, you can now insert the video.
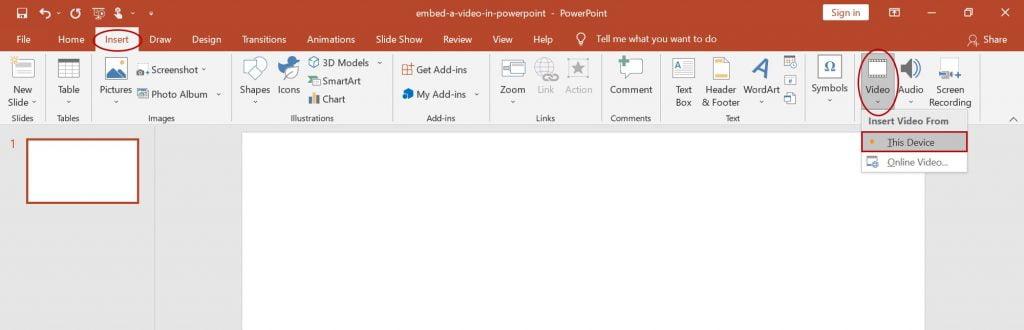
- Go to the “Insert” tab in the top navigation bar.
- Then click on the “Video” arrow button in the “Media” group.
- Then select the “This Device” option.
The “Insert Video” dialog box opens. From there, find and select the video you want to insert.
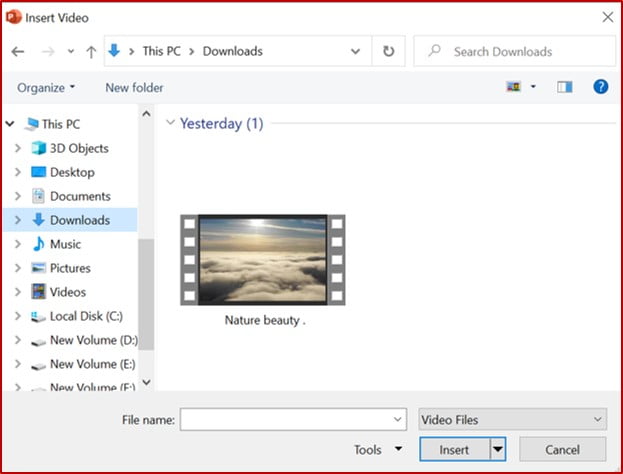
Now PowerPoint embeds the video in the selected slide.
Step 3: Format the video
Set playback of a video in PowerPoint
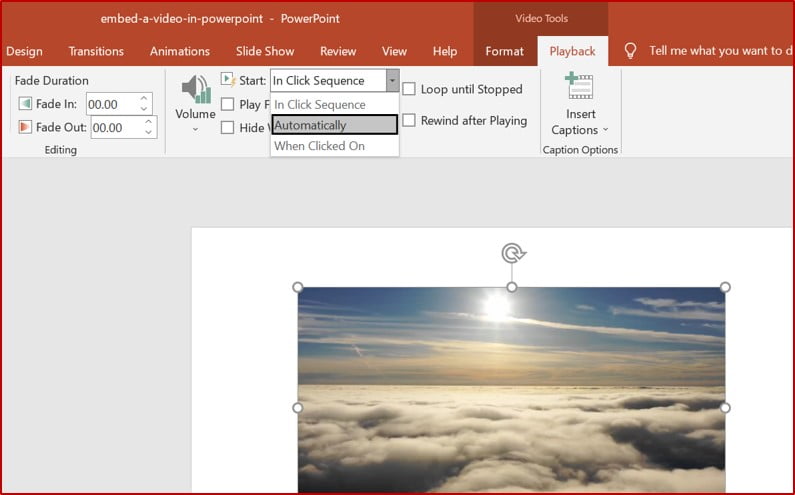
Once your video is embedded in PowerPoint slides, you can adjust it as you like. You will notice two pop-up tabs “Format” and “Playback” that appear when you select the video.
For example, if you want your video to play automatically, go to the “Playback” tab and select “Automatically” from the “Start” drop-down menu:
Otherwise, if you want the video to play only when you click or after a sequence of clicks selects the option “When Clicked On” or “In Click Sequence“.
Edit the playback settings of the video
PowerPoint offers the option of adjusting the volume of the video, shortening the video as required, and also changing the duration of the video. It works like this:
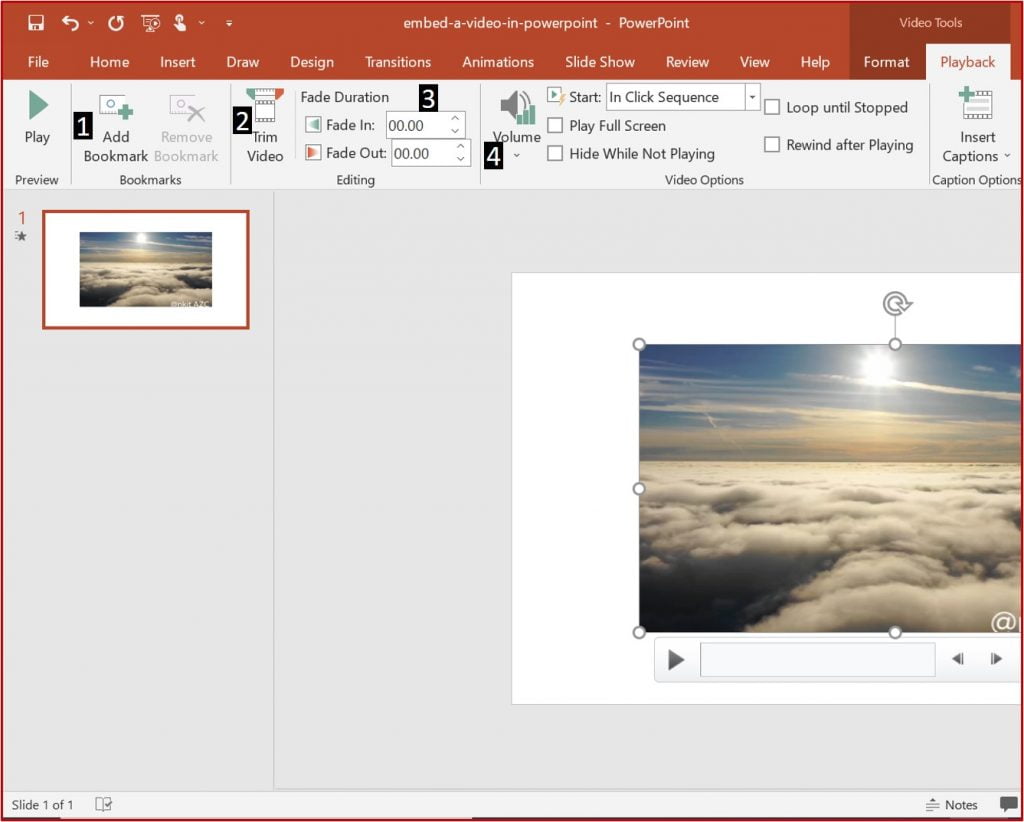
1 Mark the video.
2 Open the “Playback” tab.
3 Editing options now appear in the tab. Select the desired option here.
- “Add Bookmark” can be added as required under the “Bookmarks” group. (1)
- Bookmarks group are helpful if you don’t want to show the entire video, but only the most important excerpts.
- Under “Trim video”, the video can be shortened to the exact section that is to be shown, if desired. (2)
- If you change the numbers in the boxes “Fade-in/Fade-out” under “Fade Duration“, the time in which it fades the video can change as required. (3)
- The “volume” can also be adjusted. The options are low, medium, high, and mute. (4)
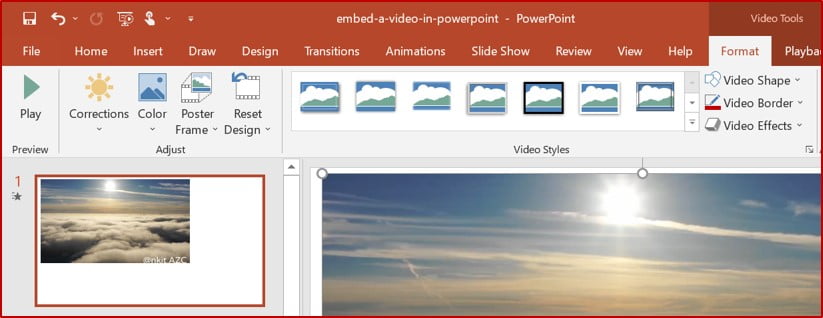
You can also change the style of the video from the “Format” tab by selecting one of the pre-defined styles as shown in the screenshot below:
If you want to add a border to the video, click on “Video border” and select the border color and thickness.

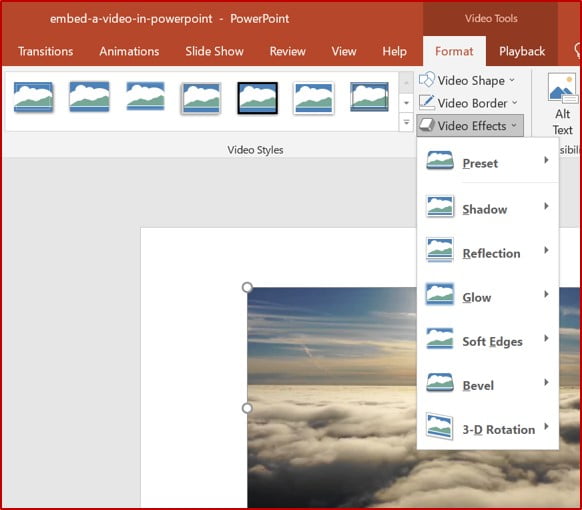
It is also possible to apply other visual effects to the video by opening the “Video effects” drop-down menu and selecting one of the available effects (Preset, Shadow, Reflection, Glow, etc.).
If you want to change “Brightness/Contrast” to the video, click on the “Corrections” drop-down menu and selecting one effect. Here you can also change the video “Color” and add the “Poster Frame” from the “Adjust” group.
When you’re happy with how your video looks, start your slideshow to make sure everything is to your liking, and you’re done!
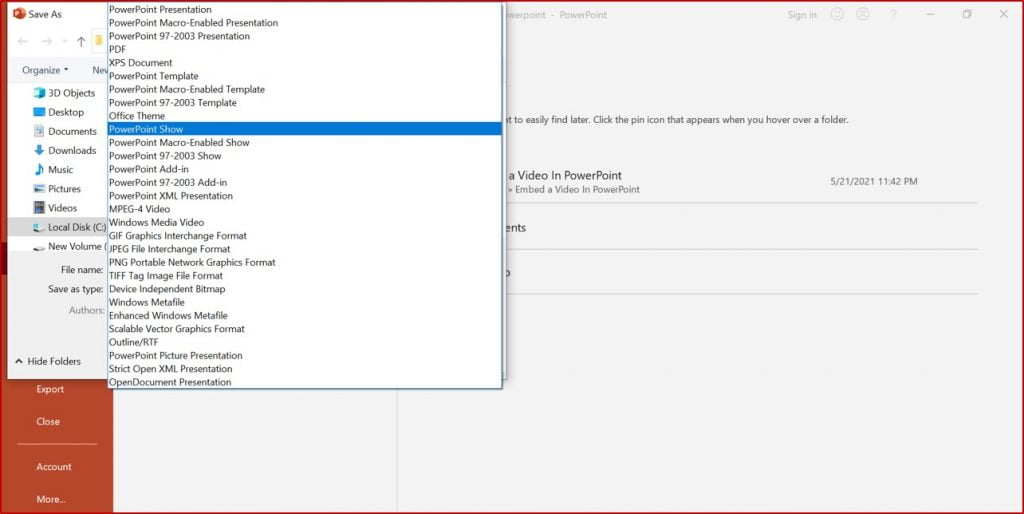
When you finish creating your presentation and adding your downloaded videos, save it as a packaged PowerPoint presentation, not as a full PowerPoint file.
To do this, go to the “File” menu and then to the “Save As” option in the left pane. Navigate to the location where you want to save it and then select “PowerPoint Show” in Save as type.
After marking your presentation, don’t wait until the day of the presentation to check if everything is going as planned. Make sure to test the file on another computer to verify if everything is working fine.
Note
Embed a video in PowerPoint from your computer increases the file size of your PowerPoint presentation. Be aware that this can make sending by email difficult.
How to embed YouTube video in PowerPoint
Only the video streaming site supported in PowerPoint is YouTube (only 2010, 2013, 2016, 2019, and newer versions). As with PC videos, previous versions of PowerPoint allowed to add YouTube videos only using a hyperlink that linked to the video on YouTube. This means that when you click on the PowerPoint hyperlink instantly opens a new window of your default web browser.
Fortunately, newer versions have made things better so that we can play the YouTube video on your presentation without going to a new window.
We offer two methods below to embed YouTube videos in PowerPoint. You can determine the process which is the most suitable for you.
Method 1: Embed YouTube videos in PowerPoint as an online video
If you are using a recent version of PowerPoint (from version 2010), you are in luck. The recent versions include a built-in feature that lets you embed YouTube videos in PowerPoint slides. Below are the steps to use it:
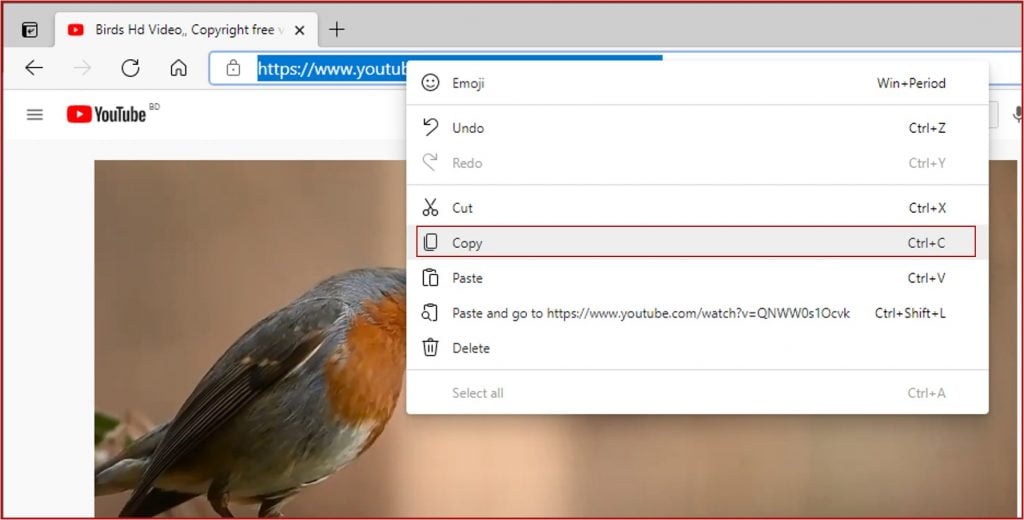
1 First, open YouTube on your favorite web browser and find the video you want to embed in your presentation.
2 Then copy the link from the address bar. To do this, select the URL and right-click on it then select “Copy“.
3 Open your presentation and go to the slide where you want to add the video.
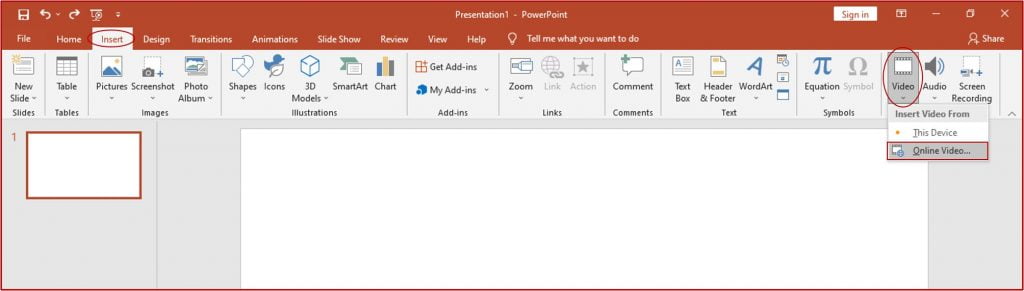
4 Go to the “Insert” tab and click on the “Video” arrow button in the ” Media” group and select the “Online video …” option.
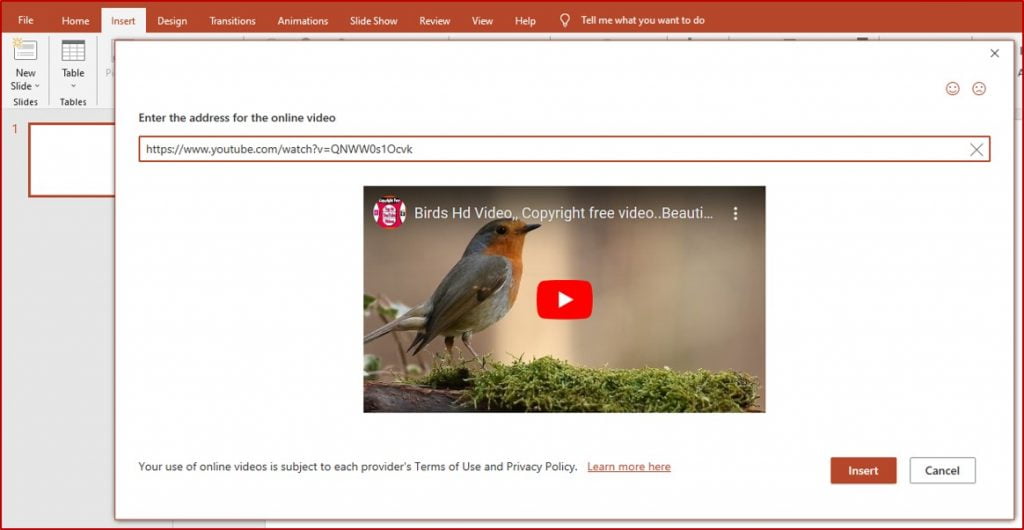
5 Appears the “Online Video” dialog box. Right-click in the box under “Enter the address for the online video” and select “Paste” from the context menu.
6 Then, to embed the YouTube video, click “Insert.”
This method is quick and quite easy to implement. However, it has some drawbacks. In fact, if you embed a YouTube video in PowerPoint as an online video, it will require viewers to have an internet connection to play the video. Also, it cannot work in PowerPoint 2007 and earlier versions, and the video playback cannot customize.
Method 2: add YouTube video with embed code
There is a way that is more advanced that you can use to embed YouTube videos in PowerPoint. This technique comprises using the embed code while allowing you to change and customize the attributes of the video as you like using the YouTube API settings.
To insert a video using an embed code, follow these steps:
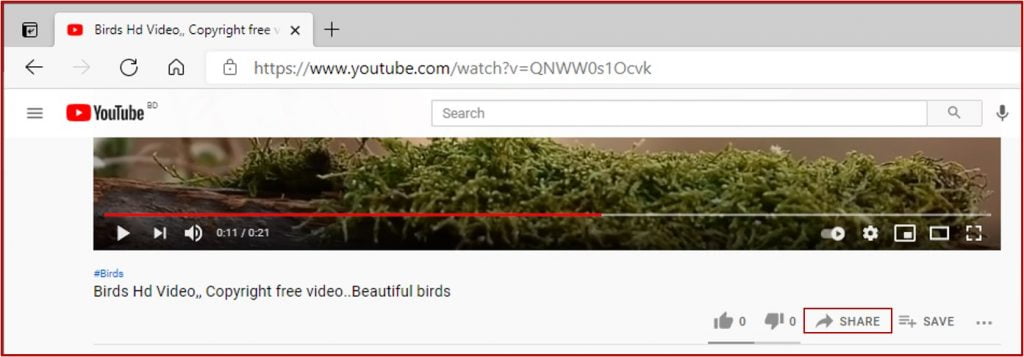
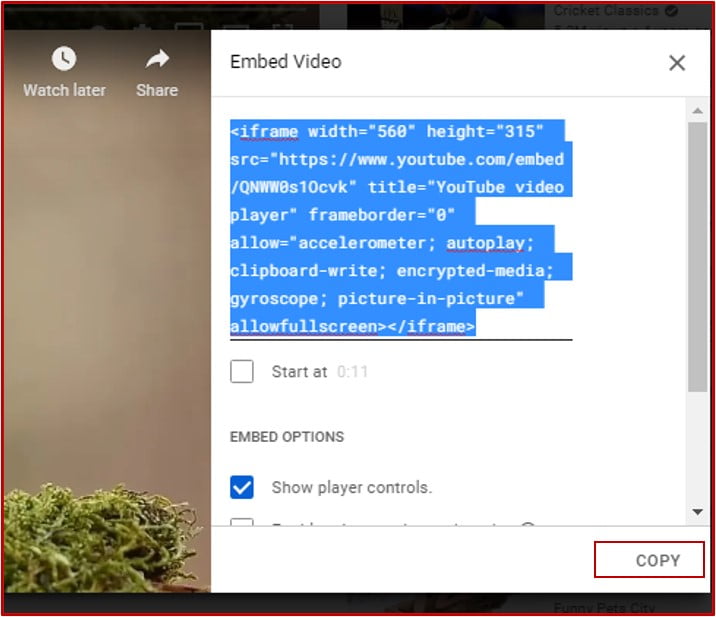
1 Open your browser and go to YouTube to find the video you want to embed.
2 Then click on “Share” at the bottom of the video.
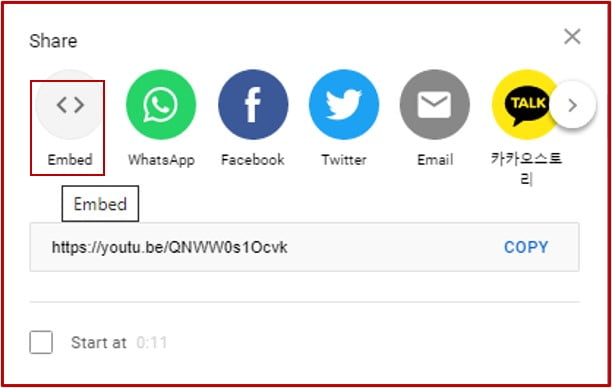
3 The “Share” window opens. Click on the “Embed” option.
4 Another window opens, displaying the code. Click on “Copy” to copy the code.
5 Now open your PowerPoint presentation and then go to the slide where you want to keep the video.
6 Go to the “Insert” tab and click on the “Video” command button then select “Online video…“.
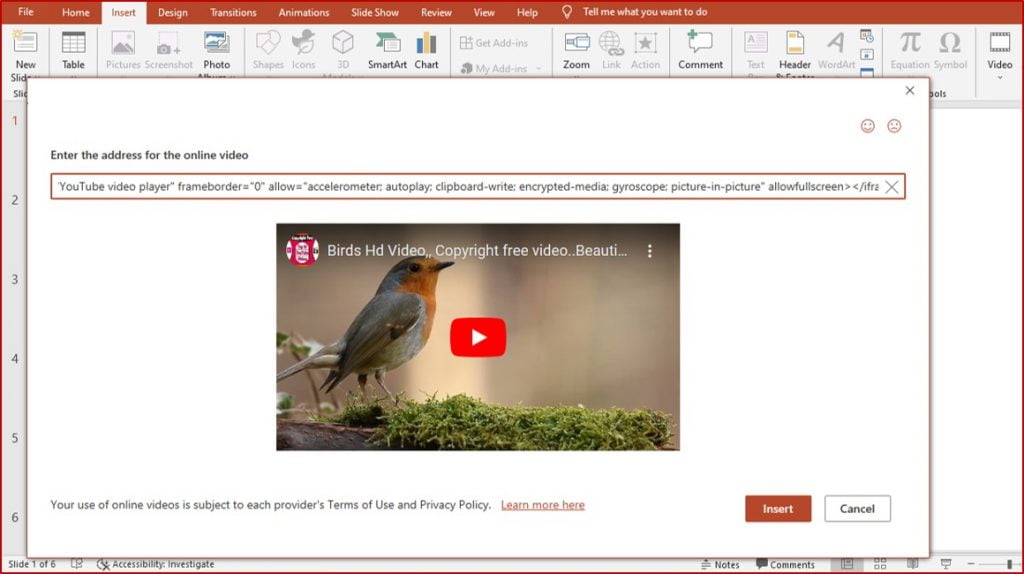
7 The “Online video…” dialog box opens. Right-click in the box under “Enter the address for the online video” and select “Paste” from the context menu to paste the code.
8 Then click on “Insert” or press Enter and it will automatically integrate the video into the current slide.
Notes:
YouTube videos can be deleted at any time, so there is no guarantee that they will still be available in your presentation.
Make sure you are aware of and obey any potential copyright restrictions on any videos you embed.
Embed a video in PowerPoint: Pros and Cons
| Advantages | Disadvantage |
|---|---|
| Video lives permanently in the PowerPoint file: no internet access is required. | Dramatically increases the size of the PowerPoint file. Video file formats will not always be compatible with systems. |
An embedded video, like text and images, becomes an integral part of the presentation. With embedded video, you can upload a single file or share it with someone without worrying about whether the video is accessible. The disadvantage is that embedded videos often result in large file sizes.
This can make the PowerPoint project file too large to easily share or upload. You also need to be careful what file format the video is in. Newer systems may have problems displaying old or opaque file formats and vice versa.
Conclusion of embedding a video in PowerPoint
In order to make PowerPoint presentations more entertaining, integrating videos is an ideal design tool. Graphic contents often convey information better than purely verbal or textual forms of representation. In addition, videos loosen up presentations and can thus rekindle the audience’s attention.
You can easily embed a video in PowerPoint slides from your hard drive or the Internet. The many integrated editing options and video tools of PowerPoint give each embedded video an additional personal touch. Let your creativity flow.


[…] Microsoft PowerPoint program allows you to add various types of audio and video sounds to a presentation. Set your own audio files is also possible. We can start the sound each […]