
Steve Wilhite is a US software developer, who was looking for a technique that how to create animate images in the smallest file size. And finally, he invented a GIF (Graphical Interchange Format) image format/file extension for an often animated raster graphics file in 1987.
GIFs are a series of images or soundless videos that loop continuously, requiring no one to push the play button.
It is the second most common image format used on the Worldwide Internet. Until PNG became a viable alternative, it was the standard for 8-Bit color images on the internet. You may have seen them in a lot of email signatures. An animated GIF is a group of multiple images or frames that combine into a single file.
Now, in this article, I am going to explain to you how to insert a gif in PowerPoint.
Add an animated GIF to a slide
Fortunately, this is very easy to do. Insert a GIF in a PowerPoint slide, just like any other image. For example,
1 Select the slide on which you want animated GIFs to be displayed.

2 Then go to the “Insert” tab,
3 Click on the “Picture” button and appear 2 options to insert a picture. One is “This Device” and another is “Online Pictures“.

4 Click on “This Device” (or “Inset“, depending on the PowerPoint version you are using), if I already saved your animated file on the hard drive.

5 Select the desired GIF animation on the window that opens and click “Insert“. Or you can simply drag and drop a GIF file from any folder into the PowerPoint slide. One way or another, an animated GIF will appear in your presentation.

Insert an animated GIF in PowerPoint from an online image search
If your animated GIFs files do not have available on your hard drive, then you need to select the second option (Online Pictures).
1 On the “Insert tab“, click “Picture” then click Online Pictures or Insert Picture (depending on your version of PowerPoint).
2 Enter “animated GIF” in the search box and select your desired image.
3 And click “Insert“.

Or you can insert your GIFs from the “OneDrive” which are available in the Online Pictures dialog box’s left corner.
Note
GIF animation is only supported starting in PowerPoint 2010. To use GIF animation in your presentations, you need PowerPoint 2010 or newer. Animations will not work in older versions of the editor.
How to adjust or edit animated GIFs in PowerPoint
You can drag anywhere on the slide, and the corner handles can be used to resize the image.

You can resize the image by pressing the Shift key if you need to keep a uniform ratio.
A GIF, like any other, can be rotated.
After selecting the image, a rotated arrow will visible on the image top middle. You can be rotated by the arrow or using “Rotate Objects” which is available under the “Arrange” group.
If the GIF image is selected, then on the Format tab, you can change the style of the picture: select the frame, borders, and effects for the picture.

Notice
It is important to remember that when you change the parameters of the GIF image; you need to start the presentation mode to check if the image is still animated or becomes static (some parameters turn the animated image into a static one).
How to insert a GIF in PowerPoint multi-slide presentation
If a GIF image needs to be inserted into several slides. You can use any of the methods that are already listed above, but there are two quick and easy ways to insert a GIF in a PowerPoint presentation.
- Highlight GIF-picture
- Use the keyboard shortcut CTRL+C to copy it.
- Go to the next slide, and press the key combination of the CTRL+V to paste it.

If you need to add an image to all slides, then the best practice is to insert it into the Slide Master, then the image will be an element of the slide design and you will not have to insert it separately on each slide. Follow this process.
1 Click the “View” tab from the top line of the ribbon.
2 In the line that opens below, look for the “Slide Master“, click on it.

3 The program will switch to the template interaction mode after you select “Slide Master.” Here you can create your required variant of the template.
Select the appropriate option from the list by the left and click on it.

4 After the template has been successfully created, exit this view by clicking the “Close Master View” tab.

5 Apply the created template to the desired slides. To do this, in the left vertical field containing the slides, press the right mouse button on one of them. Move the cursor over “Layout” and select the created template there.

After that, the slide will be changed, and a gif animation will be added to it.
Note
This option is suitable for cases when you need to add a large amount of gif-animation to the presentation. For isolated cases, creating a template will be ineffective.
Controlling GIF animation loops
The majority of GIFs are built to loop continuously, which can annoy in a PowerPoint presentation. You may use any online GIF editor to make the animation stop after a certain duration of time.
So, you can change this by editing the GIF before adding it to the PowerPoint slide.
Once you’ve saved GIFs to your computer, using an online editor like ezgif.com to edit them is a relatively simple process. You can use other online tools like- gifmaker.org, giphy.com, and so on. These online applications give you the ability to create your own GIFs, cut some parts from the video, or combine multiple images together.
Under Upload image from your computer, click Choose File to locate the GIF file on your computer. Select the file and click the Upload button.

The page displays an animated GIF file, along with information about the file size, width, and height of the image, as in the figure:

Click the Split to frames button! (divide into frames) below is the animated GIF.
After processing, the page will display a frame-by-frame view.
Below the frames (scroll down the page if necessary) is the Edit animation button.
Click the Edit animation button.

The page re-displays the set of frames with the Skip, Copy, and Delay options for each frame. There are additional parameters below the frames, including the Loop Count.
In the GIF options section, enter the number of times the GIF file will be played in the Loop Count box.

Click the Make a GIF button! (Create GIF file).
After processing, the modified GIF file will be displayed under the Make a GIF! (Create GIF file). A save button appears on the right below the modified GIF.

Click the Save button to keep the modified GIF file on your computer.
Depending on the browser, the GIF file will be saved in the Downloads folder or another folder of your choice.
After you save the modified GIF to your computer, you can add it to your PowerPoint slide.
Where can I find GIFs for a slide presentation?
As with stock photos, clip art, and videos, there are countless sites and portals online from which you can download free GIFs for PowerPoint. “Giphy.com” and “tenor.com” are just two of the umpteen examples. The quality, expressiveness, sense, and nonsense of what feels like 95% of these GIFs are definitely questionable, but if you take some time to search, you will definitely find one or the other useful GIF here. Quite simple but well-made GIFs for business presentations can be found on ACEGIF.com
Another option is to create your own GIFs. This works on the one hand with websites such as “Giphy.com”. You upload a video, cut it to size and, if you wish, you can also add written statements to it. Even simple pictures can be animated with short texts, stickers, and/or filters.
Of course, this is also much more complicated! If you have a lot of time, patience, and muse, you can also create a personal GIF using Photoshop/PowerPoint. That this process can easily take longer than creating a complete slide presentation is quite likely.
How to Make GIFs in PowerPoint by yourself
Did you know that you can save PowerPoint slideshows as GIF animations? GIF animation is a file format that enables video-like expression by connecting still images like flipbooks. It’s easy because you only have to select the format when exporting.
It is attractive to be able to play in any environment
In PowerPoint updated to the latest state, save slideshow as GIF animation. It is now possible.
If you save it in the GIF animation file format, you can create a video-like expression in which slides are played continuously, like a flipbook. For example, it looks like this.

The following two points are typical advantages of GIF animation.
- No special situation required for playback
- The file size is small
Let’s see the procedure for creating a GIF animation in PowerPoint below.
Create a slide
To save a slideshow as a GIF animation, simply select the file save format when exporting. Here, we will explain the preparation for creating the above GIF animation.
1. Resize slide
First, resize the slide from the Slide Size button on the Design tab. Here, select [Standard (4: 3)]. You can also select Custom Slide Size and specify any aspect ratio.

2. Specify the content size
It is a screen of how to handle the size of the text box and image included in the slide. If you want to delete all existing text boxes and work with them, you can choose either Maximize or Ensure Fit to Size. Here, we selected Maximize.

3. Insert a text box
We had resized the slide. Delete all existing text boxes. Select Draw Horizontal Text Box from the Text Box button on the Insert tab to insert a new horizontal text box.

4. Enter text and Icon
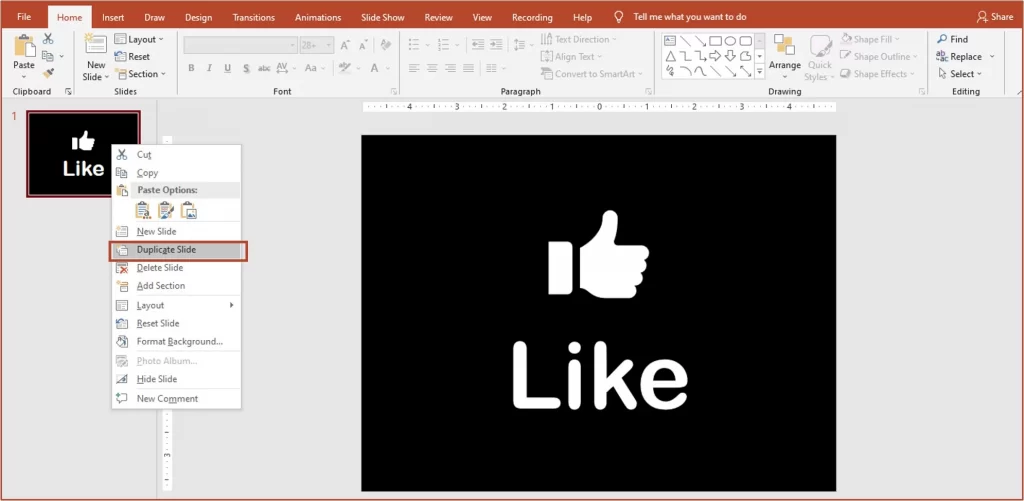
Click anywhere on the slide to insert a text box. I typed “Like” and insert an icon. Enter your character and icon on one slide.
5. Resize text
Select the text you entered and specify the font size and insert an icon and also resize it.
6. Adjust the size and position of the text box and the Icon
Drag the handle of the text box to adjust its size and position. Set the text to Centered and spread the left and right text box to fill the slide for better balance. I think it is easier to adjust the vertical position by operating while looking at the image of the slide on the left side of the screen.

Select the icon. After selecting the icon, a Graphics Format tab is visible under the Graphics Tools, then go Align and select Align Center.
To select both of them (text & icon), you can drag the mouse over them or use a keyboard shortcut Ctrl+A and group them using Ctrl+G and finally, go to Align and select Distribute Vertically.
7. Change the text and the icon color
Here, we want to have white characters and icons with a black background, so change the character and the icon color to “white“.
Select the text box and select text color as white from Font color on the Home tab.

Select the icon and go to the Graphics Format and select “white” color from the Graphic Fill.
We were able to change the text and icon color to “white“. The slides are also white, so the letters and icons are not visible.
8. Change the background color of the slide
Click anywhere on the slide to deselect the text box. Click the Format Background button on the Design tab and specify the fill color. Select [Fill (single color)] and we are choosing the color black. You can select anyone.

It has changed the background color of the slide to black.
9. Create another slide
Select the created first slide, then right-click on it and click Duplicate Slide.
Change the letters or characters and icons, and create the remaining slides.

10. Set animation
Set the animation for the last slide. Select the text box and select an animation from the Animation tab. Here, “Fly In“ (from right) is selected. This completes the slide.

Save as GIF animation
The point when saving as a GIF animation is the slide switching time.
To save as GIF, go to the File tab, click Export > Create Animated GIF.

In order to switch to a good looping, we set it to “0.3 seconds” here. Depending on the content of the slide show, if you want to read it carefully, you should specify “5 seconds”. Click the Create GIF button to complete.
PRO Notice
Office 2019 and 2016 do not support this feature.
An Office 365 subscription is required to use this feature.
If you are not an Office 365 subscription, follow the next step to make an animated GIF from the PowerPoint slide.
To do this, go to the File tab, click Export > Create a Video.

Set time for [Time required for each slide (seconds)]. And finally, click the Create Video button to complete.
After making a video, then go online and search “video to gif“. Upload the video and convert as a GIF and save or download (we already discussed this in our Controlling GIF animation loops section).
Conclusion
GIFs are more popular today than ever before and can be a great way to add personality, character, or humor to your PowerPoint presentation.
No matter how you pronounce the word GIF, PowerPoint can handle these animated images to bring your presentation to life.
FAQs
Why do we need to insert GIFs into PowerPoint
1. GIFs allow us to immediately catch the quick attention of the public.
2. It allows us to respond to many of the public’s preconceived notions with fewer words.
3. This is a good guide for solving a pressing topic.
Tips for adding GIFs to your PowerPoint presentation
1. Make your presentation easy to follow.
2. Use humor.
3. Combine GIF images with your text.
How to insert a gif into google slide
Now it is time to find out how to do it. Don’t worry, it’s easy like ABC. So get started!
If your GIFs are already stored on your hard drive, then open Google Slide and go to the Insert tab > Upload from computer > select desired GIF > Click Open.
If don’t have any GIFs stored on your computer, then you need to online search. Go to any search engine and search “animated GIF”, choose a GIF.
1. Right-click on the GIF image which you want to use and then click “Copy Image Address.”
2. Open Google Slides and go to the “Insert” tab.
3. Choose Image> By URL.
4. Paste the address of the image you copied earlier.
5. Click the “Insert” button.
Great site you have here.. It’s hard to find high-quality
writing like yours nowadays. I truly appreciate
people like you! Take care!!
Thanks