
Most of the time, you are probably using Microsoft Excel for works such as making reports, forecasting, and planning. It is possible to build a database in Excel.
To build a database in Excel- easy to enter, store, and find specific information in an Excel database file. Whether it’s a personal list of contact numbers, a contact list for an institution, or a finding of parts, Microsoft Excel has built-in tools to track data and search for specific information.
Excel has a lot of databases functionality. Excel can build a simple searchable database, but it can also apply to make a proper relational database. A relational database build of a master table linked to its slave tables also called child tables.
Before start building a database in Excel
Unfortunately, hardcore Excel and MS Office tools are not taught in our respective schools and colleges. Several of the complex functions and laws that you learned in your impressive degree have now become a concept that isn’t backed up by empirical data. You’d think this is just data. However, you should be conscious that we know this as a “Data dump.”
It is, therefore, essential to be able to organize this dump in a very readable format. This format at least vaguely resembles this theoretical concept, which defined the phenomenon for this data.
When you’re stuck in a situation like this, MS Office’s features come in useful. Access is the standard database you should be using, but it is a bit tricky to learn and master. On the other hand, Excel is more familiar and comfortable to use.
You can easily use your Excel workbook as a database if you plan it properly. The most important thing to remember is that you must create your workbook correctly. You can sort the data in different ways. You can filter the database to display only data that matches specific criteria.
The table is the interface to the program’s workspace—a relational database structure information in rows and columns. While Microsoft Access, a stand-alone program for building and managing databases, is included in the standard MS Office package, users also use Microsoft Excel for the same purpose. After all, you can use the program’s features to sort, format, filter, edit, organize, and structure data.
To build a database in excel, you need to work that all. One warning: the Excel program is a versatile analytical tool, more suitable for complex calculations, calculations, sorting, and even storing structured data, but in small quantities.
What is the need or benefit of building a database in Excel?
We mainly used Excel spreadsheets for data analysis and object sorting in order to store raw data for a limited period. We primarily used the spreadsheet for number crunching and storing a single list of objects. Hence, it is the best application for maintaining inventory, calculation data, and statistical data modeling.
But when it comes to storing large amounts of data, it’s best to build a database in Excel. If more than two users need to share information, the database is best suited.
Apart from that, the two most important advantages of the database in Excel are:
- Reduced data redundancy.
- Data integrity capability will increase.
- Reduced update errors and increased consistency.
- Greater integrity and independence of data from application programs
- You can easily manage reports and share data.
- Better data security.
- Reduction of the costs of data entry, storage, and retrieval.
Database structure–Excel table
Database: a set of data distributed in rows and columns to facilitate research, organization, and editing. How to build a database in Excel?
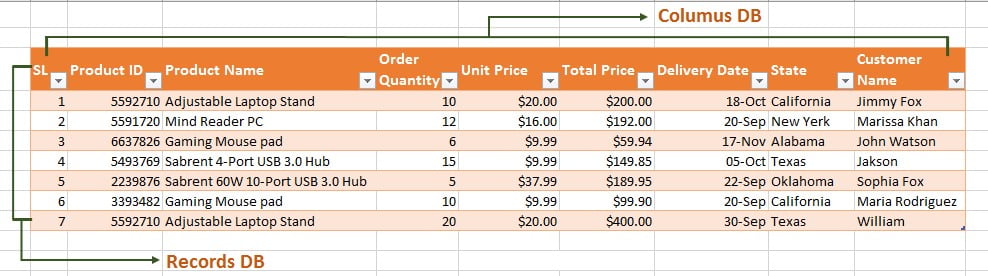
All the database information is including in the records and fields:
- Record is a database row (DB), which provides information about an object.
- The field is a database column that contained data of the same type for all objects.
- In a standard Microsoft Excel spreadsheet, database records, and fields correspond to rows and columns.
Build a database in Excel is not difficult if you know how to make a simple table.
How to build a database in Excel?
We will, therefore, take this example and show you the steps to build a database in Excel.
Step 1: Enter data
It’s time to enter your information. Make it as many rows as you think are necessary. The arrow keys should help you navigate your worksheet while confirming your entry in a cell; you need to hit the enter key. To type your data, keep your mouse cursor under headers in the excel worksheet then enter your data. If you type data below the line, press the Enter button or press the Tab button in the right cell. If you want to manage data from different datasheets, you can copy and paste it into your spreadsheet. To paste it into your database, click on cell A3 and press Ctrl + V on your keyboard. It will pass the data under your headers:
A button in the upper left corner of your worksheet allows you to pick all of the cells in your spreadsheet. The intersection of the column and row headers is where you’ll find this button. We will select all cells in our worksheet when you click this button. Navigate to the Data tab on the ribbon. A category called “Sort and Filter” can be found there. The “Filter” button, which looks like a funnel, is on the left side of the screen. Select it by clicking on it.
Fields are the names given to the columns in a database. You can add as many as needed.
Thus, this database’s fields are SL, Product ID, Product Name, Order Quantity, Unit Price, Total Price, Delivery Date, State, Customer Name.

You can now quickly enter data into the database. Each new entry will add to the first empty row after the fields.
I made some. Let me show you how to enter another entry.
Say this is the entry that needs to insert into the database:

So you see that entering data into an Excel database is pretty basic.
Step 2: Enter the data correctly
When entering data into a database, you cannot leave a row blank. That is strictly prohibited.
Say after the last row; I put data in the second row:

That is a clear breakdown of this database.
Although some cells in a row may be empty, let’s say something like this is legal.

Along the same lines, another rule is: there won’t be an empty column in a database.
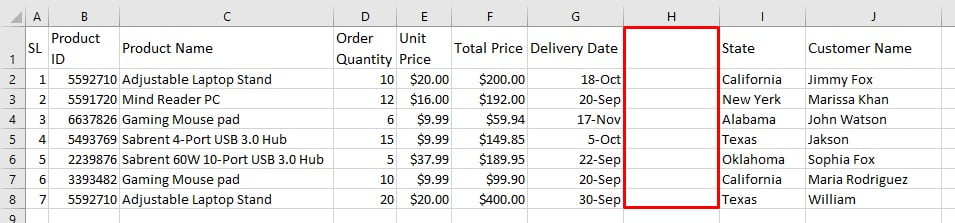
As soon as Excel encounters an empty row or column, it is impossible to include that row or column in the database. For Excel, we split this database into two parts, an entirely new and unconnected set of information.
Whatever functions you plan to do, your data will not perform on this disconnected information. For example, something as simple as filtering will fail, as you can see from experience.
Although rows in an Excel database are called records, columns are called fields. Each column needs a header to identify the data it contains. These headers are called field names.
- Use the field names to ensure the data is entered each record in the same order.
- Make sure the same format to enter data in a column. If you enter digits as numbers (such as 10 or 20), continue. Don’t change halfway through and start entering numbers as words (such as ten or twenty) you need to be consistent.
- The table must not contain any empty columns.
Note: It is essential to format the field names differently from other rows in the database. These table field names formatting with styles that are different from those of other table cells.
Step 3: Create the table
Once the data is entered, it can convert into a table. To convert data to a table:
- Highlight you’re entering data range to press Ctrl+A or manually (like A2 to G8) in the worksheet.
- Select the Insert tab.
- Click on the table which is available in the table group, and press OK.
- Before press OK, you need to make sure the My data has headers checkbox is ticked, and the range is selected properly.
- You can do the same tusk by press Ctrl+T.
- You can give a proper name to the table under the table design tab.
- To change the table design, click on the table style’s drop-down arrow under the table design tab and select anyone you want.
- For your table, expand automatically, enter the data after the last column because we have created a table.
Step 4: Use the Excel database tools
Once the database is built, you can use the tools below the drop-down arrows next to each field name to sort and filter your data.
Sort data
- Click on the drop-down arrow to that column you want to sort.
- To sort the database alphabetically, select sort A to Z.
- We have the database sorted now, Adjustable Laptop Stand is the first record in the table, and Sabrent 60W 10-Port USB 3.0 Hub is the last.
Filter data
- Click on the drop-down arrow to that column you want to field.
- Need to make sure unchecked select all checkboxes.
- Add a checkmark to the box that you want to show filtered.
- Select OK.
- To display all records, select the drop-down arrow next to the filtered column and select Clear filter from the “State”.

Step 5: Develop the Excel database.
Now that all is up and running, you can index more fields and records to your database. To enter extra records to your database:
Place your mouse arrow above the tiny dot in the below right corner of the table.
- The mouse pointer changes to a two-headed arrow.
- Drag the mouse pointer down to add one or more blank rows to the database bottom by holding down the right mouse button.
- Please enter the data after the last column because we have created a table.
- Or you enter that data in the last table row, and the table would expand automatically.
- Add the data to this new line.

Build a database in Excel: finish formatting
- Highlight cells A1 to I1 in the worksheet.
- Select Home.
- To center the database title, click Merge and Center from the alignment group.
- To change the fill color of the selected cells, click the Fill Color drop-down list and select your choosable fill color.
- To change the Font Color of the selected cells, click the Font Color drop-down list and select your choosable font color.

Excel Database: Pros and Cons
Excel database records are beneficial for building simplistic tables or worksheets based on numbers and formulas. When considering your data management options, consider these advantages and disadvantages of the Excel database. When we build a database in Excel, some pros and cons are as follows:
Excel database
- It is better to use it for calculations and statistical purposes.
- It is best for data analysis.
- It is an excellent solution for quick and occasional use, such as expense reports.
- Its format of rows and columns is easy to understand when creating your spreadsheet.
- It’s an affordable solution.
- It’s perfect for a single user.
Disadvantages of Excel database
- It is not the best option for data management.
- It isn’t easy to collaborate on the same document and to circulate an updated version within a team.
- It will report errors if cells or rows are left blank.
- It is challenging to master the formulas and use them correctly.
- Data is difficult to summarize when presented in a spreadsheet.
- It is challenging to create pivot tables.
Recommended Articles
This is a guide to building a database In Excel. Here we explain how to build a database in Excel along with practical examples. You can also go through our other submitted articles –

[…] command, the Insert Function dialog will appear. At this point, it is essential to select the Database category from the drop-down […]